Monday, April 23, 2012

Non-Meyer but Lemon anyway Tart

It must be the novelty of having a blog.. woohoo 3rd recipe post in as many days. All these are past bakes anyway. I try to do it now and then here in Malaysia but the small oven just do not follow instructions very well or I just can't master the temperature setting. Most of my bakes here are not up to par and I've even threw away whole batches a few times already! I miss my built-in oven back home, my most used electrical appliance and definitely a key contributor to the electrical bills.

Back to the recipe post..

I'm not a big fan of tarts but one day, I tried a lemon meringue tart from Gastronomia, lovely, where the slightly sweet meringue nicely balanced the sourness of the filling. I set out to start my journey of tart crusts, lemon curd and egg whites.

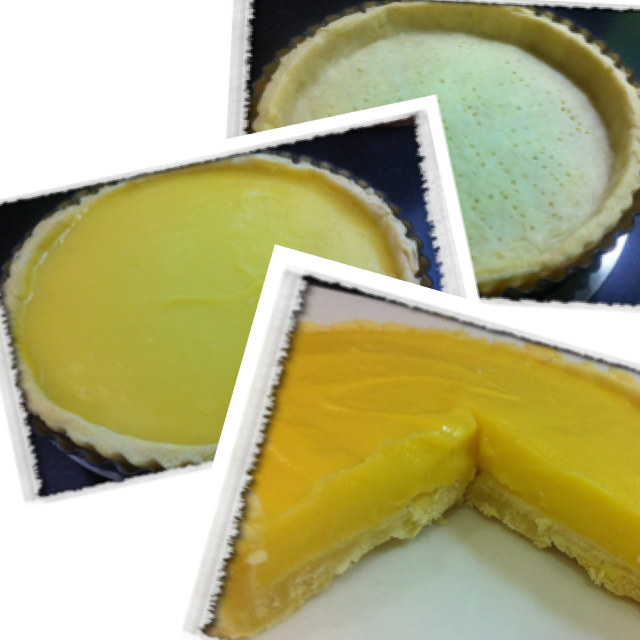
My first trial was with just a simple butter tart, a lemon curd recipe off the web and baked cinnamon apples for the topping.

Lemon Apple Tart

It was.. way too sour. The apple was meant to be sweet to counter-balance the tart but since I baked them with minimal brown sugar (trying to be healthy!), they turned out kind of bland. The sprinkle of cinnamon helped only slightly.


So.. I tried a few more lemon curd recipes.. and finally arrived at a sweet-sour balance. Indeed, a simple browned pillowy meringue is the best pairing. So far, willing friends and family have liked them and it's requested slightly more frequently than the rest.


Lemon Meringue Almond Tart
 
Almond Tart - I like to use an almond tart base, the husband loves almond!
(from my trusty Laduree recipe book)

120g very cold butter
70g confectionery sugar
25g ground almond
1 pinch sea salt
few drops of vanilla extract
1 egg
200g cake flour

1. Sift the confect sugar
2. Cut butter into small pieces
Place both into a mixer bowl with the paddle attachment, mix to combine
3. Add ground almonds, salt, vanilla essence, egg and flour one at a time in this sequence, mixing each component until just incorporated (do not over-mix).
4. Stop mixing when the dough comes together. Ball the dough up, wrap and chill for at least 2 hours. (I tend to do this the night before)

Lemon Curd

2 eggs (it should be around 100g)
35g sugar
100ml lemon juice
zest of 1 lemon (be careful not to zest beyond the surface of the lemon. The inner white bits may make your lemon curd slightly bitter)
10g butter at room temperature but not melted

1. Using a heavy saucepan or you can choose to double boil, whisk all ingredients except butter together, over medium heat. Stir CONSTANTLY, until the mixture thickens but do not boil nor let it scramble. It is ready when you use a spoon to scrape apart the mixture and it puddles back slowly.
2. Remove from heat and add the butter in 2 parts. Stir to mix well.
3. Pour into a clean bowl and leave to cool slightly. Lightly cover with a piece of cling wrap to prevent skin from forming. Cool completely.

Meringue Top

3 Egg Whites
100 sugar

In a clean,dry, non-greasy bowl of your electric mixer, use with the whisk attachment and beat the egg whites until foamy. Gradually add the sugar and continue to whip until stiff peaks form. To test, put the mixing bowl upside down, the egg white should stay in the bowl.

Place them into a piping bag.

To complete the process:

1. Remove tart dough from fridge, cut dough and place into tart moulds. Place back in the fridge for 1 hour to rest the dough. Pre-heat oven to 190C.
2. Remove tart shells from fridge, poke small holes lightly with a fork. Line the tart shells with parchment paper and fill with pie weights (I use uncooked rice, you can keep these rice bits as weights for future tarts.)  Bake the crust for 20 to 25 minutes or until the crust is dry and lightly golden brown.
3. Remove from oven, remove pie weights, pour the lemon curd into the tarts. Let it set while you prepare the meringue. Only prepare the meringue just before the tarts go back into the oven.
4. Pipe the meringue onto top of filled tarts. Pop them into the oven for 3-5 minutes or until the top is sufficiently browned. 
5. Remove, cool and chill in fridge until ready to serve. 

Tada! You are done.

Yeah, it's a long process..why do you think the Gastronomia tart cost S$8 when it's just filled with lemon and egg white!  

You can make a large batch of lemon curd and keep it for more uses.. like filling leftover biscuits or making filled lemon curd cupcakes or simply spooning them atop freshly baked scones.

Sunday, April 22, 2012

Bittersweet Peanut Butter Chocolate Molten Cake

I attended the 2nd weekend baking class in Malaysia today - Chocolate Making! Woah, never knew that Chocolate is a product of so much science and technical expertise. Different melting temperatures for dark/milk/white chocolates, followed by different tempering temperatures, techniques of tempering/moulding/casting/robing, use of other ingredients, cream/cocoa butter/salted vs unsalted butter. OMG. 2 days of information - and today we tried so many chocolates, output of our 2-day class.. it's officially Choc OD for now.

So... I'm not going to write a post on the class! Cos all the info is still swimming in my head, cos i'm too tired to type from the class notes now, cos I cannot stomach the thought of chocolates for now.

BUT. I am going to post a recipe on a Chocolate Molten Cake, one of my favourite desserts! Aaaah, the fickle-mindedness of girls. It's just like ooh I'm too full but I can still stomach a sweet dessert. Ooh I've so many pairs of shoes, but I just need that one pair I just tried on. So.. It's going to be .. ooh Im too OD to be writing on chocolates but I can do one on a chocolate cake.

BitterSweet Peanut Butter Chocolate Molten Cake - adapted from here
Ingredients (makes around 8 cupcake-sized portions, slightly bigger than a usual ice-cream scoop)
  • 141g unsalted butter
  • 220g bitter sweet chocolate (the % depends on preference, I like 70% and usually use Cadbury Old Gold 70% cocoa or Carrefour 70% Dark Chocolate, C4 brand is smooth and really fragrant, my first choice but not always in-stock)
  • 50g peanut butter (I use crunchy PB as I like some bite to the lava but use smooth PB if so preferred)
  • 1/2 cup cake flour
  • 1 cup confectionery sugar (increase if using less than 70% cocoa chocolate)
  • 3 large eggs
  • 3 egg yolks
  • 1 teaspoon vanilla extract
Options - to make a totally chocolate version, omit the peanut butter, increase chocolate to 250g and add in 1 teaspoon expresso powder for additional flavor

Instructions

  1. Pre-heat oven to 200C. Butter 8 ramekins (or I usually use those stiff disposable cupcake cups).
  2. Melt chocolate, peanut butter and butter in a metal bowl over a simmering pot of water. Be careful not to spill any water into the pot or let the steam escape into the mixture. Do not boil nor let it burn. Once smooth and melted, remove from heat and set aside to cool slightly.
  3. Add sifted flour and confect sugar into the choc mixture. Stir in until combined.
  4. Stir in eggs and yolks, until smooth.
  5. Add vanilla essence (if you are using coffee powder, add at this stage), mix until combined.
  6. Divide batter equally among the cups, place them on a cookie sheet, bake for approx 10 min. The edge of the cakes should be firm, and the centre still a little wobbly (see picture #2 above).
  7. Let it sit in the cup for around 3-5 min to firm up a little more. Run a knife around the edge. Inverse your serving plate onto the cake (not the cake onto the plate) and quickly flip the plate around. The cake should drop nicely onto the plate.
  8. Serve with ice cream on the side.
Some tips I've learnt along the way:

#1. Ovens are not created identical. Always test 1 portion in the oven first. I usually leave the first one in at 200C for 10 min in the oven (top-bottom, non-fan). If this achieves the texture I want, I will put in the next batch of 6 and bake at 200C for 11 mins. I think since there are more cakes inside, it took a wee bit more time.
#2. If the cake cannot achieve the texture needed on the first try, put it back in the oven for 30 seconds more each time. Use a digital timer, every 1 min counts for lava cakes.
#3. I use a light-coloured cookie tray on the oven rack. If using dark-coloured trays, it absorbs heat faster and you may need to reduce the time needed or the temperature.
#4. You can prepare the batter a few hours ahead of time and leave at room temperature or make it the night before, leave in the fridge and cool at room temperature before baking. If time is limited, you can still bake it but it requires slightly longer baking time. Experiment with the first couple of cups, so always make more servings than actual needed.

Have fun! It's a simple dessert to make and guaranteed to please!


Saturday, April 21, 2012

Basketful of Bread

This is my share of bakes from the 2-day bread baking class I took recently. It's the first official baking course I've taken. Being the only one in the class who's not doing the entire 3-month program (so I would not graduate with a certificate like the rest will), I think I'm taking it much easier than my fellow classmates.. Still, it's tiring. 9am - 5pm on both days, we were kneading, measuring, cleaning, moulding, baking..

It was very good learning though. I've tried couple of breads before, namely using the 65C TangZhong method preferred by asian bakers as it yields a soft texture and slightly sweet flavor (more about that in another post, hopefully..) versus the crusty exterior, chewy interior more signature of european breads. There are alot of recipes, information, step-by-step video guides on the internet but I guess the advantage of being in a classroom is really in learning or fine-tuning techniques, getting tips from the chefs and asking as many questions as you can to tap on their expertise. It's also a quick way of learning many different things in a short time frame, I would probably take months to try out the various bread recipes in the class if it was based on my own effort. Ta Da! All these in just 14 hours!

My favourite of the above - the multi grain


Recipe:

350g Bread Flour
150g Multi Grain Flour
12.5g Yeast
5g Bread Improver
7.5g Salt
275ml Water (Can add more if dough is too dry but should be around 50-55% of flour volume)
67ml oil

Mix all ingredients except salt and oil in a mixing bowl, set up the dough hook and start from low speed, graduating to medium speed once the ingredients come together. Add salt and oil when the gluten has developed and the dough pulls away from side of the mixing bowl.

Knead till the dough is elastic and reached windowpane stage. Round the dough up and proof under cover until double in size (ard 45 min but really depends on the temperature of the room).

Place some flour onto counter and dough on top. Punch the dough down to deflate the air. Shape as desired. Gently wipe dough with a wet cloth and roll dough onto multi-grains/oats/nuts (or any other toppings) to coat. Make some cuts onto top of bread to allow steam to be released during baking.

Proof again for around 45 min (proof is done when a finger pressed lightly onto the dough leaves an indentation behind without bouncing back).

Place onto baking tray and bake at pre-heated oven at 190C for 10 min, reduce temp to 175C and bake for another 15 to 20 min.  Bread will sound hollow when tapped. Cool completely before cutting.

For Rye bread, substitute Multi-grain for Rye flour. Ratio of bread flour to rye/multi grain flour can be adjusted to change the texture of bread. Above uses 70-30% ratio. a 50-50% ratio would yield loaves with a heavier texture.

Rye loaf:
(For loaves, no need to make cuts on the bread)
Other shapes taught to us:


The other breads we learned were Foccacia, Ciabatta, Baguette, Soft Rolls and Pizza. All were pretty yummy, especially the soft rolls that were really soft, with butter and milk but way too sinful. The foccacia was everyone's favourite, savory and very fragrant, doused with a good measure of olive oil and filled with plenty of herbed potato.

More about Foccacia in another post!

4.5 months on..

I drafted a whole list of things that I'd like to do when I move to Malaysia to start my 6-months stint. Hah! I was either too ambitious or I am too lazy.

My list:
Share our wedding photos with our friends
Upload our Europe photos onto FB
Start a Blog
Increase my frequency of workouts
Cook a daily portion of veggies for dinner
Try out new baking recipes in individual serving portion

Guess how many I end up doing?? I think only 1..

So... 4.5 months later, I finally started THE BLOG. which.. I hope will survive when I return to SG. Not a good writer and too lazy to think/write too much anyway, the objective (every project must start with an objective right???) of this blog is just to capture my baking trials and errors so my forgetful self can refer easily. Currently, the notes are just sitting in a notebook, a file, several plastic folders and random note-to-selfs on FB.

So.. to commemorate my first post, I will capture my first baking lesson ever attended.. in the next post.